
Using the form creation Wizard
As an alternative to using the form designer to build you form from scratch, you can use the From Creation Wizard to do some of the 'heavy lifting' for you and let you it the ground running.
The wizard works by taking an existing form that you currently use in either Word, PDF or Excel format, analysing the form by looking at the types of data that you're capturing which it then uses to build the first version of the form for you. It then takes you into the Form Designer at which point you can amend and add advanced features such as business logic.
To access the Forms Wizard, from the home page:
- Click Forms
- Click New Form to take you to this page
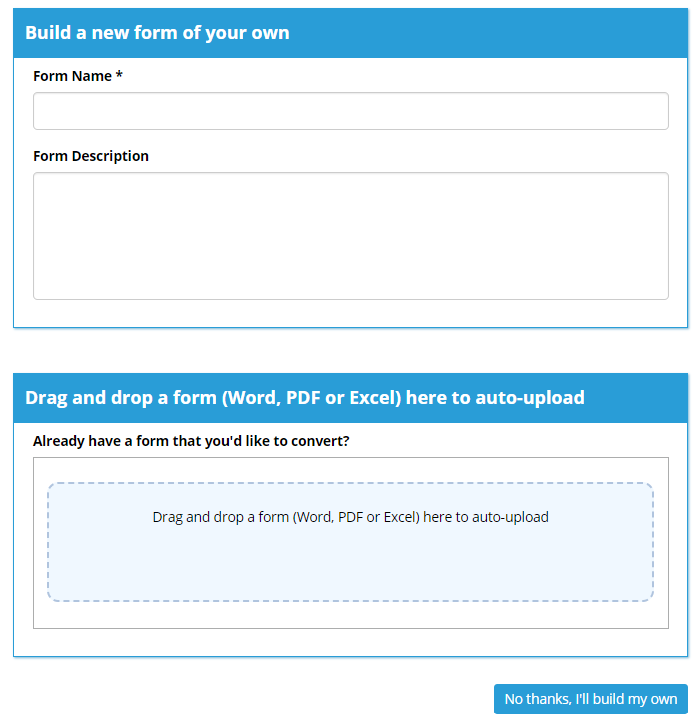
- Enter a name for you form in the Form Name field.
- Drag your document into the area designated 'Drag and drop a form (Word, PDF or Excel) here to auto-upload'.
After a few moments you'll be presented with a screen similar to the following:
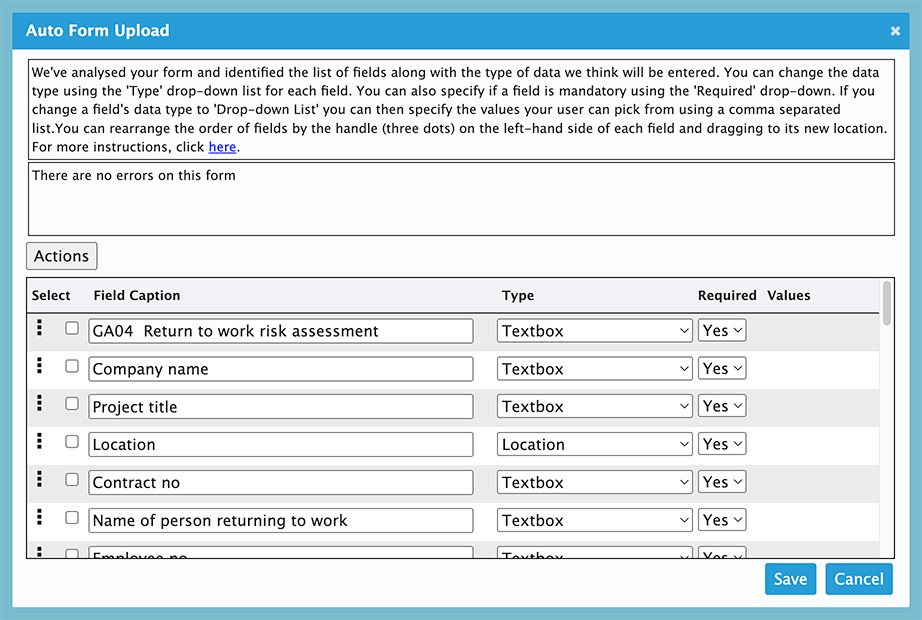
At this point, you have an opportunity to to make a number of amendments before progressing to the Form Designer:
Changing the Field Type
The Forms wizard attempts to understand from you form, what type of data that you're wanting to capture. For example if you had a field on your form labelled Visit Date, the Form Wizard would assume that you want to capture a date so would therefore choose the field type as Calendar. Alternatively if your form had a box labelled Company Name, the Form Wizard would assume that you want to capture text so would therefore set the field type to Textbox.
There are occasions however when the Wizard guesses the the wrong type. You can however change the type at this point simply by:
- Click the Type drop-down list for the field that you wish to change.
- Select the correct type from the list.
Changing the Field Caption
You can change the field caption simply by typing into the Field Caption text box for any field.
Setting the Required Flag
When you build a WorkMobile form, you can decide if any field is required or not. Setting a field to required means that when using the App to complete the form, your user can't proceed without entering a value for the field. By default, the Forms Wizard sets all fields to Required. To change this:
- Click the Required drop-down for the relevant field
- Click No to set the field as not required.
Deleting a Field
Sometimes, the Forms Wizard will identify what it believes to be field from your form, that actually isn't. In this case you simply delete the field by:
- Ticking the Checkbox to the left of the Field Caption
- Clicking the Actions button
- Clicking Delete Selected
Re-Ordering a Field
You can change the order of any field simply by clicking and holding the grab handles (3 vertical dots to the left of the field) and dragging to the new location.
Adding a Field
You can add missing fields simply by:
- Clicking the Actions button
- Click Add New
- Navigate to the bottom of the list and you'll see an empty slot that you can then complete to add your new field.
Tables (or repeating Data)
Often in real-world forms you'll have a table of repeating data such as the following example snipper from a form:
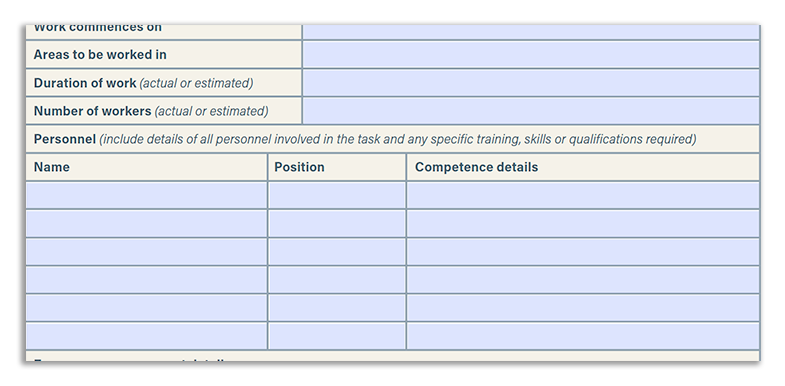
As you can see, Name, Position and Competence details are the headings for a table in which you'll capture 0 or more repeating lines of data containing a name, position and competence details.
You can tell the Forms Wizard to turn these fields into a repeating set (or using WorkMobile terminology, a subform) by doing the following:-
- Select the fields that you want to repeat. In the example above, you'd select Name, Position and Competence Details.
- Click the Actions button
- Select Group Selected
The screen should now look something like this:
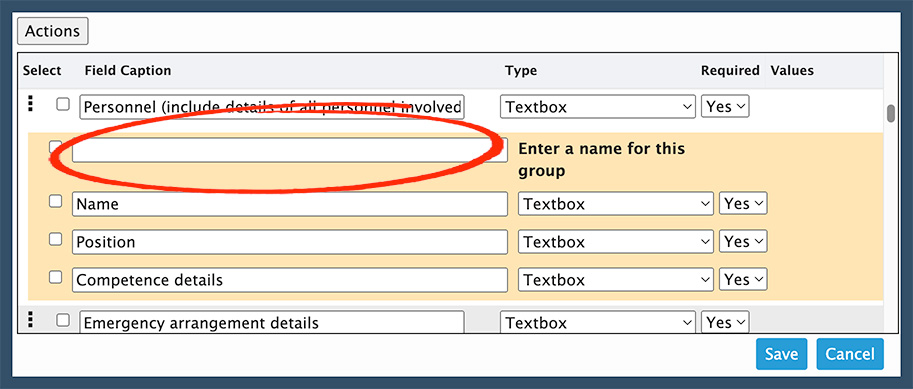
- Enter a name for the Group in the box highlighted above.
Saving to the Form Designer
Once you're happy with any adjustments that you've made within the Forms Wizard editor, simply click Save which will take you through to the Form Designer in which you can continue to edit your form.