Creating a Custom Menu Structure
Custom Menu allows you to design a personalised structure for accessing your completed data and utilising various aspects of your WorkMobile account. With pre-configured filters, you can ensure that your team has quick and easy access to the data they need every day, without the hassle of continually refining their searches.
Accessing Custom Menus:
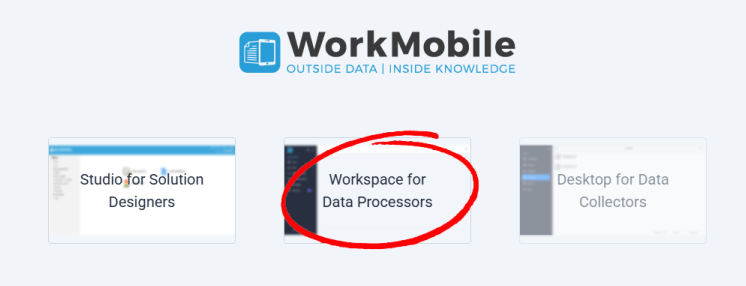
Custom Menus can be accessed through the WorkMobile Workspace. Simply log in using your current email address and password, and select Workspace for Data Processors from the App Selector page .
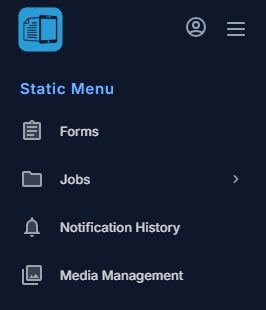
Once logged in, your designated Custom Menus will appear on the left-hand side of the screen. The data or pages associated with these menus will open within the main window on the right.
Building a New Custom Menu:
Begin by expanding the Portal Builder option and selecting "Custom Menus" from the left-hand menu on the main WorkMobile dashboard. You can either create a new menu or edit existing ones.
To create a new menu, select "New" from the left-hand menu. This will take you to the menu-building process.
Designing Your Custom Menu:
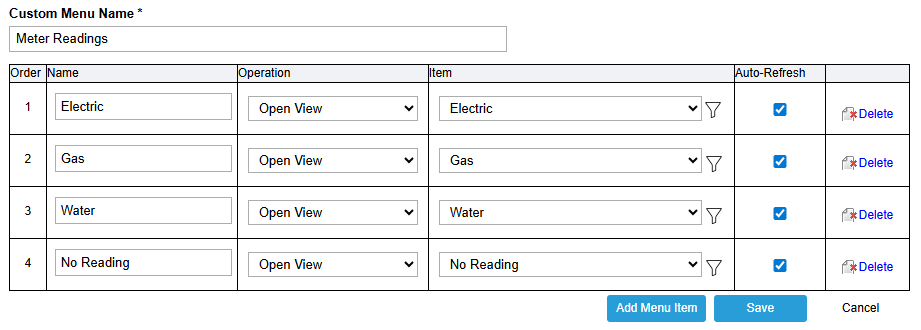
After choosing to create a new Custom Menu, you'll enter the Menu Design page. Here's what you'll need to do:
- Custom Menu Name: Provide a unique name for your Custom Menu. This name will be used within the WorkMobile website and will help identify your menus for assigning to users and using within other Custom Menus.
- Order: Arrange the items within your Custom Menu in the desired order. You can drag and drop items to achieve your preferred layout.
- Name: Enter the name that will be displayed within the Custom Menu on the WorkMobile Workspace for the respective entry.
- Operation: Choose from a variety of functions within the Operation drop-down list that can be used within the portal:
- Open Menu: Access other Custom Menus you've built.
- Open View: View pre-configured Filtered Views.
- Open Form: View Completed Records table for your forms.
- Open Approval: View the Approval process you have setup.
- Open Forms List: View the full list of Forms on your account.
- Open Job List: View and filter all jobs on your account.
- Open Schedule: Access a calendar view of the Jobs on your account.
- Open Notification History: View and filter your account's Notification History.
- Open Report: View reports from your account.
- Open Media Management: View uploaded media items, such as images and drop-down sources.
- Open Users: View a list of Users that are on your account.
- Open External Webpage: Access external webpages directly within the WorkMobile Workspace. (Please note, however, that embedding is subject to the security policies of the respective websites, and some sites may restrict this functionality)
- Auto-Refresh: When enabled, it automatically refreshes selected views or lists every two minutes.
Assigning a Custom Menu:
Once you've designed your Custom Menu, you'll need to assign it to the User Groups you want to via the User Group page.
- Go to the User Group page by expanding the User Management option and selecting "User Groups" within the left-hand menu on the main WorkMobile dashboard.
- Select the desired User Group to which you want to assign the Custom Menu.
- Within the User Group Edit page, find the drop-down labelled "Initial Custom Menu." Choose from the list of Custom Menus you've built on your account.
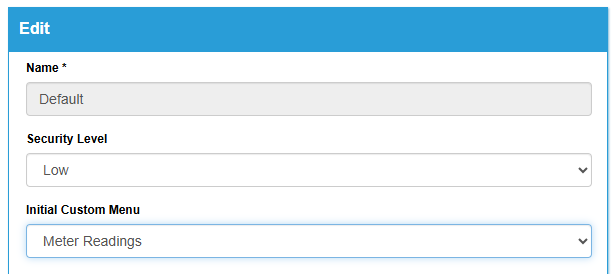
Remember, if you leave the Initial Custom Menu as the default value ("<None Specified>"), the portal will display default options such as "Forms", "Jobs", "View Notification History" and "View Media Management" upon login.