
Extensibility Scripting
Introduction
Extensibility scripting allows you to write complex functionality for forms using TypeScript. It can be used to:
- Replace complex formulas.
- Load data from external web sources.
- Use external APIs to process data.
- Adding validation to fields that is too complex to replicate using formulas (i.e., regex)
Pre-Requisites
People with knowledge of JavaScript.
Knowledge of TypeScript is not needed as all JavaScript is valid TypeScript, but it is beneficial to understand the error messages they will get.
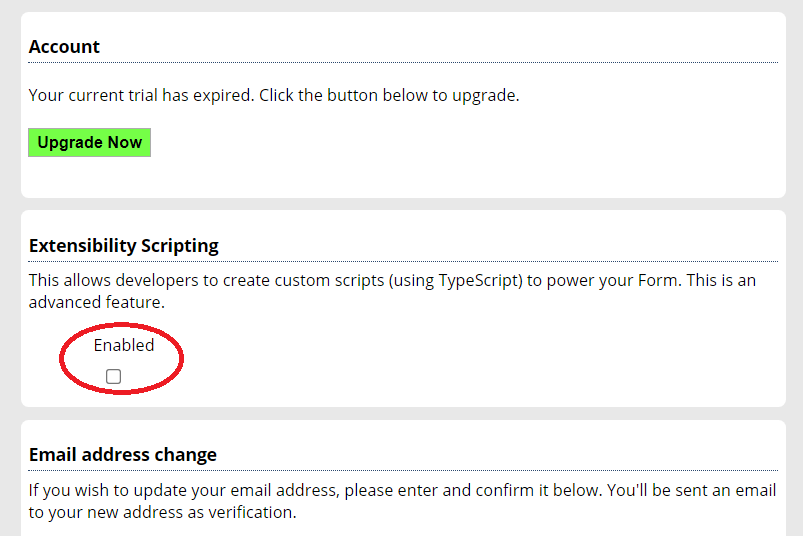
Enabling Scripting
Scripting needs to be enabled on your account before you can begin to use it. This is done from within the settings page.
Once this is enabled, you will have access to two new features in the form designer: the script editor as well as a new widget, button.
Script Button & Button Control
Once enabled, you'll now see an additional button within the form designed screen
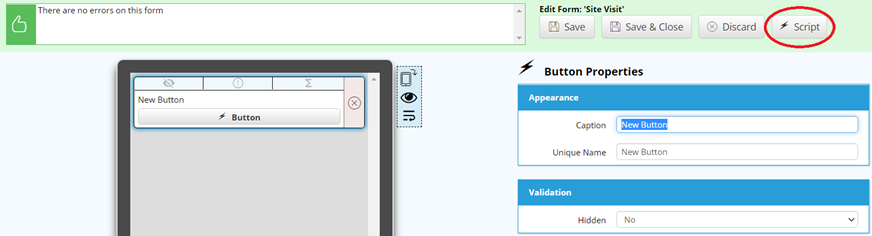
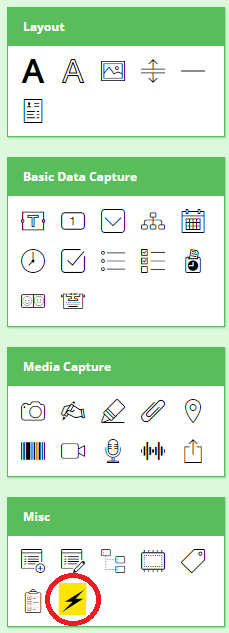
Additionally, you'll also see an additional widget within the toolbox, but more of this later.
Using the Scripting Editor
To begin writing your script, click the Script button. The following window will appear (although initially yours won't contain any code!).
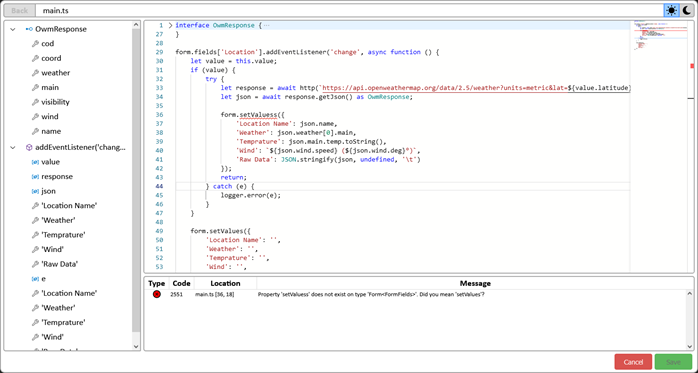
The editor window consists of the following elements:
1. Navigation bar (Top)
This shows you the name of the file you currently have open, and a button to navigate back to the file you were previously viewing. It also contains buttons to switch between light & dark mode.
2. Document Outline (Left)
This shows you the symbols of the current file and allows you to quickly navigate to them.
3. Error list (Bottom)
This will show any errors / warnings / hints on your script.
4. Text editor (Centre Right)
This is where the current script is displayed.
The text editor uses the same codebase as Visual Studio Code, so you may be familiar with the functionality. If not, you can press F1 inside the editor to view & search all available commands and their key bindings. You can navigate to the declaration of a type by pressing Ctrl + F12 while the cursor is over it or pressing Ctrl and clicking on it. The declaration file for the device APIs can also be downloaded here.
Getting Started
Each form has a single script file associated with it to contain your entire script. In order to interact with the form you’ll need to add change event listener to each form object (widget) that you wish to trigger the action. The event will be triggered when the value within associated with the object has changed. Additionally, you can add a button widget to you form and add a press event listener to activate your code when the button is clicked.
The script will have access to the global variable 'form'. This contains the ID and name of the current form, the job ID if applicable, and an object for each field that is usable by extensibility. All fields extend the type FormField, but each field type will have a corresponding JavaScript class. For example, any number fields will be of type NumberField in the script. You can access the fields either by indexing the form.fields object or calling the form.getField method with the unique name of the field. You can use this object to get the current value of the fields in the script, and some field types allow their value to be set from the script.
User Interaction
In addition to reacting to events and being able to change values on the form, you can also interact with the user using the following available methods.
- toast – shows a text message at the bottom of the screen.
- loading – shows a loading spinner which can be used to temporarily block the screen.
- alert – shows an alert box with a message.
- confirm – shows a yes / no dialog with a message
- pick – shows a dialog with a list of options.
Important
These interactive methods will only work when using your form within the WorkMobile App. If you are using the form within the WorkMobile website for editing data then these methods will not work.
HTTP requests
The http method can be used to make asynchronous web requests from the script. It works similarly to the fetch API from web browsers. It has a URL parameter, an optional options parameter and it returns a promise that resolves with the response.
Debugging
You can debug code by using the logger and console objects. The console.show() method will show a text window that will display any content logged by the logger functions, if the log level is below the value of the console.level property. The logger.log method will serialize any objects passed into it as json. If you are logging a debug message, the objects will be serialized with more information, e.g. functions and non-enumerable properties will be shown. The logger object has a function for each log level, which is shorthand for calling logger.log(LogLevel.<level>, args). You can log raw text by calling logger.logText, as calling logger.log with a string will log a JSON serialized string. You can use debugger statements in your script, which will log the call stack and all local variables with LogLevel.Debug. There is also a log file that is written to, which can be accessed from the help screen. By default, only LogLevel.Warn and LogLevel.Error messages will be written to this file, but you can change this by changing logger.level.
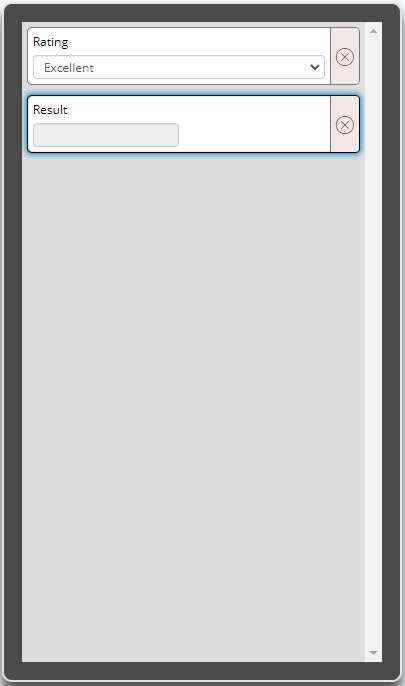
A Simple Example
For this simple example we’re going to build a very simple form containing a drop-down list and a number widget. The drop-down list will contain multiple values such as Excellent, Good, Average etc and we want to convert the selecting into a numeric value which can be held in result. To do this normally, we would need a large expression:
=IF('Rating'="Excellent",  5,
 IF('Rating'="Good",  4,
  IF('Rating'="Average",  3,
   IF('Rating'="Bad",  2,
    IF('Rating'="Terrible",  1, 0)))))
This expression will get longer and harder to read as more options are added to the drop-down. The script below replicates the functionality of the script above however, not only is it simpler to understand, it also has the benefit that it won’t need altering if new options are added to the list.
form.addEventListener('Rating', 'change', function() {
    form.fields['Result'].value = this.selectedIndex;
});
Breaking down the above script, we first use the form.addEventListener method to create an event listener. The first method of the argument is the name of the widget that you wish to attach to. In this case it’s the Rating widget. The next parameter is the type of listener that we want which is a change event. Finally we have the actual code which will fire when the change event for the Rating widget is fired.
In this case we simply use the form.fields object passing in the name of the field that we wish to update.
Loading data from an external source
This example shows how you can use the location widget to capture the current location of the mobile device and then supply this information to an external weather service API to retrieve the latest weather information. The returned information is then displayed in the in the 3 separate text fields, Weather, Temperature and Wind
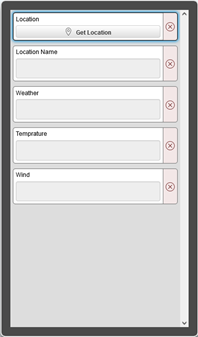
form.fields['Location'].addEventListener('change', async function () {
  let value = this.value;
  if (value) {
    try {
      let baseUrl = 'https://api.openweathermap.org/data/2.5/weather'
      let response = await http(baseUrl + `?units=metric&lat=${value.latitude}&lon=${value.longitude}`);
      let json = await response.getJson();

      form.setValues({
        'Location Name': json.name,
        'Weather': json.weather[0].main,
        'Temperature': json.main.temp.toString(),
        'Wind': `${json.wind.speed} (${json.wind.deg}°)`
      });
      return;
    } catch (e) {
      logger.error(e);
    }
  }

  form.setValues({
    'Location Name': '',
    'Weather': '',
    'Temperature': '',
    'Wind': ''
  });
});
You’ll notice that we used a slightly different approach to attaching the change event listener to the location widget in this example by calling the addEventListener method from the form.fields object. Both are functionally identical and is simply personal preference is to which you use. The other point to note is that we add the term async before defining our function call. This is required in this case due to the fact we’re using the await keyword before making our call to the web service and waiting for the response. Due the fact we don’t know how long this call will take, this allows execution to continue within the app and doesn’t hold up the user.
Using the Button widget and an Alert Box
This simple example shows how you can attach a press event listener to the button widget to carry out an action when the user presses the button. In this example we’re going to use regular expressions to validate the format of the credit card number that they typed in. Don’t worry if you don’t understand regular expressions as pretty much nobody else does!
We’ll then use the alert box to pop up and inform the user as to if the number is valid or not.
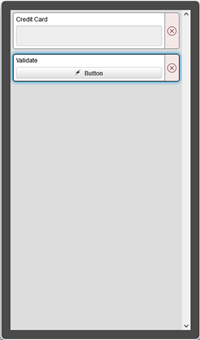
const regex = /[0-9]{4}-[0-9]{4}-[0-9]{4}-[0-9]{4}/m;
const field = form.getField('Credit Card');
form.addEventListener('Validate', 'press', () => {
    alert('Validation', regex.test(field.value) ? "Valid!" : "Invalid!");
});
As you can see, the alert call takes 2 parameters:
alert(title, message)Using a ‘Picker’ to Show a List of Values to the User
In this example we’ll show you how to build a dynamic pick list to the end-user, then allow them to pick a value which we’ll place back into our form. In the example, the user enters a list of values in the Values multi-line text box. When the user clicks the button, the values are then displayed in a picker with the chosen value finally displayed in the Result check box.
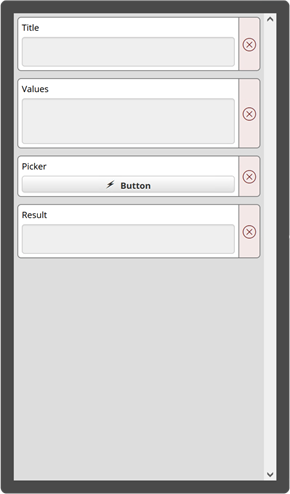
form.fields['Picker'].addEventListener('press', async () => {
let ttl = form.fields['Title'].value;
let values = form.fields['Values'].value.split('\n');
let result = +(await pick(ttl, values));
 form.fields['Result'].value = result < 0 ? '' : values[result];
});
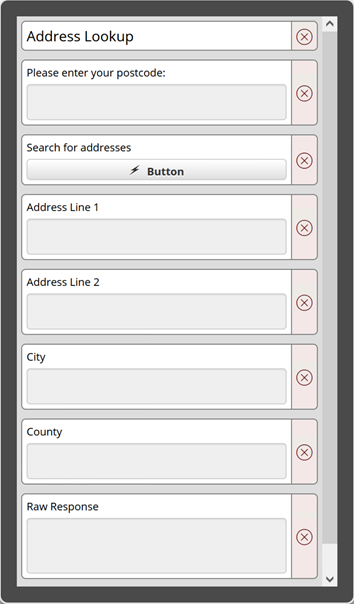
Calling an external address lookup service
This is a longer example which more closely resembles a real use case. In the example, the user enters a post code and clicks the button. An external call is then made to an online address lookup service and the results are then presented to the user in in a pick list. The selected address is then used to populate the address fields.
interface AddressifyResult {
    "address_id": number,
    "postcode": string,
    "post_town": string,
    "dependent_locality": string,
    "double_dependent_locality": string,
    "thoroughfare_and_descriptor": string,
    "dependent_thoroughfare_and_descriptor": string,
    "building_number": number,
    "building_name": string,
    "sub_building_name": string,
    "po_box": string,
    "department_name": string,
    "organisation_name": string,
    "UDPRN": number,
    "postcode_type": string,
    "su_organisation_indicator": string,
    "delivery_point_suffix": string,
    "address_key": number,
    "organisation_key": number,
    "number_of_households": number,
    "locality_key": number
}

interface Address {
    line1: string,
    line2: string,
    city: string
}

interface AddressifyResponse {
    "code": number,
    "message": string,
    "postcode": string,
    "addresses": AddressifyResult[]
}

type RemoveNever<T> = Pick<T, keyof { [P in keyof T]: T[P] extends never ? never: P }>;
type ExtractFieldKeys<T> = { [K in keyof FormFields]?: FormFields[K] extends MutableValueField<T> ? K : never }[keyof FormFields];

type ExtractFieldValues<T> = { [K in ExtractFieldKeys<T>]?: FormFields[K] extends MutableValueField<T> ? T : never };

const keys: ExtractFieldKeys<string>[] = [
    'addr_ln_1',
    'addr_ln_2',
    'addr_cty',
    'addr_county'
];

const cache: Record<string, Address[]> = {};

async function pickAddress(addresses: Address[]) {
    if (addresses.length == 0) {
        await alert("Alert", "No addresses found!");
        return;
    }

    let options = addresses.map(v => v.line1);
    let index = await pick("Select an address", options);
    if (index >= 0) {
        var f = form.fields;
        var address = addresses[index];
        f['addr_ln_1'].value = address.line1
        f['addr_ln_2'].value = address.line2
        f['addr_cty'].value = address.city;
    }
}

const postcodeRegex = /^[A-Z]{1,2}[0-9]{1,2} ?[0-9][A-Z]{2}$/i;

function parsePostcode(input: string): { display: string, trimmed: string } {
    if (!postcodeRegex.test(input)) {
        return null;
    }

    let upper = input.toUpperCase();
    let split = upper.split(" ");
    if (split.length == 1) {
        let end = upper.length - 3;
        return {
            display: upper.substring(0, end) + ' ' + upper.substring(end),
            trimmed: upper
        }
    } else {
        return {
            display: upper,
            trimmed: split.join('')
        };
    }
}

function getAddresses(values: AddressifyResult[]): Address[] {
    let result: Address[] = [];
    for (let value of values) {
        let address: any = {
            city: value.post_town
        };

        let location = '';
        if (value.building_name) {
            location = value.building_number ? `${value.building_number} ${value.building_name}` : value.building_name;

            if (value.organisation_name)
                location = value.organisation_name + ', ' + location;

            address.line1 = location;
            address.line2 = value.thoroughfare_and_descriptor;
        } else {
            address.line1 = `${value.building_number} ${value.thoroughfare_and_descriptor}`;
            address.line2 = '';
        }

        result.push(address);
    }

    return result;
}

async function lookup() {
    let postcodeText = form.fields['Postcode'].value;
    if (!postcodeText) {
        await alert('Warning', 'Please enter a postcode.');
        return;
    }

    let postcode = parsePostcode(postcodeText);
    if (postcode == null) {
        await alert('Error', 'Invalid postcode!');
        return;
    }

    logger.info('Postcode: ', postcode);
    form.fields['Postcode'].value = postcode.display;

    for (let key of keys)
        form.fields[key].value = '';

    let addresses = cache[postcode.trimmed];
    if (addresses != null) {
        await pickAddress(addresses);
        return;
    }

    let loader = loading('Looking up postcode...');
    try {
        let response = await http('https://app.autopostcode.com/api/search', {
            method: 'POST',
            headers: {
                'Content-Type': 'application/json',
                'token': 'Tqj3r-QeUSo-dMJK9-9bkxz'
            },
            content: JSON.stringify({ postcode: postcode.trimmed })
        });

        logger.info(response);

        if (response.success) {
            let content = await response.getJson() as AddressifyResponse;
            form.fields['addr_response'].value = JSON.stringify(content, undefined, '\t');
            addresses = getAddresses(content.addresses);
        } else {
            let content = await response.getText();
            logger.error('Request failed: (' + response.statusCode + '): ', content);
            await alert('Error', 'An unknown error occured');
            return;
        }
    } catch (e) {
        logger.error('HTTP request failed:', e);
        alert('Error', e);
        return;
    } finally {
        loader.dispose();
    }

    cache[postcode.trimmed] = addresses;
    await pickAddress(addresses);
}