
Using jobs
Setting up a Job Type
Before we can go ahead and send out a job, there’s a little bit of configuration that needs to be done the very first time by setting up a job type.
WorkMobile allows you to create different job types for different types of work that your business may carry out. For example:
You can think of a job as a partially pre-filled form. In our fictitious business, we want to send our engineers to pre-booked appointments. We know the name of the customer and the address in advance so it would make sense for us to supply this pre-populated in the form for each appointment. What’s more it saves the engineer any needless typing.
- First of all, log into your WorkMobile account and select Jobs from within the top menu panel.
- From within the job's menu, select New Job Type
- Fill in the Job Type Name, we’ll call it Service Visit
- The Live checkbox should already be ticked to allow a Job Type to become active.
- Once you have completed section 1, scroll down to section 2.
- You will need to choose the form on which the Job Type is based. In our example, we’ve selected Job Sheet.
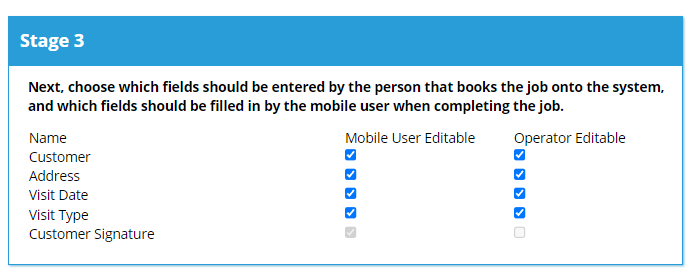
- The next section may look a little complicated however it’s actually quite simple. This section allows you to configure which fields on the form your mobile user must complete (Mobile User Editable) and which fields you’re back-office user must complete (Operator Editable).
It’s possible to have both the mobile user and the operator edit a field. Imagine a scenario whereby the operator supplies a customer name, however you may want to give your mobile user the ability to verify the spelling and correct if necessary.
You’ll also notice that certain fields are automatically checked for the mobile user and cannot be checked for the operator. This is the case whereby it only makes sense for a mobile user to complete, e.g. a signature or a photograph.
Check out the screenshot below and tick the appropriate boxes on your screen.
- We’ll leave the Stage 4 configuration for now however in short, this allows you to configure which fields appear in the summary list on your mobile user's inbox.
- Finally hit the Submit button to complete the configuration.
Sending Out a Job
Now that we’ve set up a job type, we’re ready to send out our first job. In order to allocate a job to a mobile user, you must create a job.
To book a job onto the system, from the main Jobs screen click the New Job button on the left-hand menu.
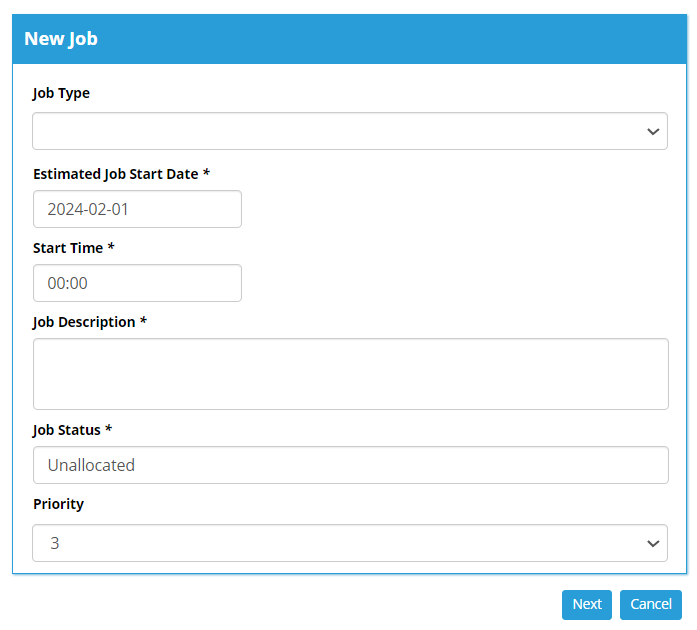
- From within the Job Type dropdown list, select the Job Type you require. In our case we’ll select the Service Visit job
- Now you need to enter an estimated start date and time so the mobile user and person in the office knows what day and time the job will be carried out and completed. Pick any date for now.
- Enter a description for the work to be carried out and click the Next button on the bottom right of the screen.
- You will now be navigated to the form that needs to be completed by the person in the office booking the job. Enter a Customer name, address, visit date and visit type.
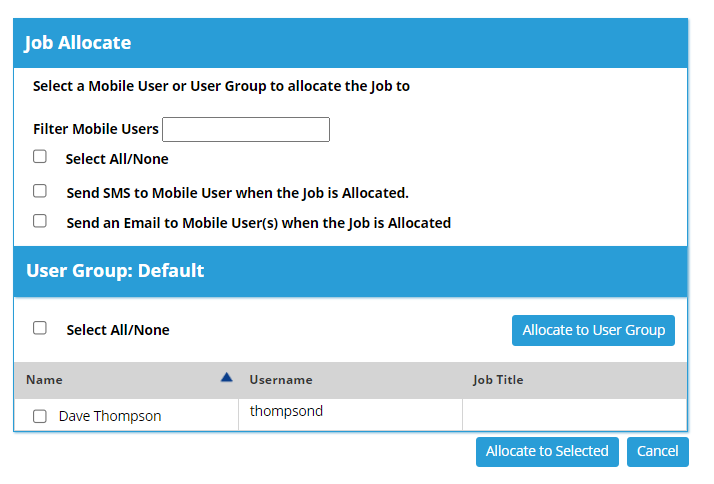
- Once you have completed the form, hit the Save and Allocate button in the bottom right of the screen, which will then take you to the Job Allocate page.
- You should now be presented with a list of mobile users. Select your mobile user then click Allocate to Selected.
Completing a Job on the device
Now that you know how to send out a job, let’s take a quick look at how this appears on the mobile device and look at how your mobile users will actually complete a job.
- First, the mobile user you have selected to receive the job must log into their WorkMobile account in order to access jobs.
- Once you have logged in, you must select Inbox from within the menu.
- Once you have selected Inbox, they will be navigated to a list of job entries.
- Select the job you require.
- You will now have the option to accept or reject the job (Please note that if you decline a job this will delete any associated form data)
- Once you have completed the job, hit Save.
- As you can see, the job has now been removed from the Inbox.